HTML Image Map
HTML is capable of creating clickable areas on an image.
We use HTML <map> and <area> elements to define an HTML image map.
The HTML <area> elements are defined inside the opening <map> and closing </map> tags to make an area clickable on an image.
We will learn the implementation through examples in this chapter.
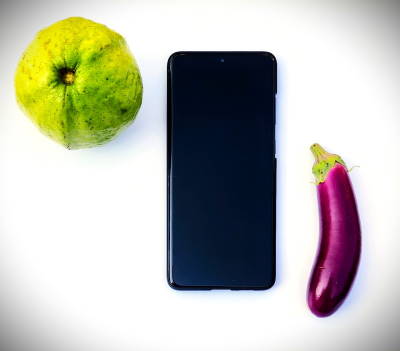
The below image is an example of an HTML image map. Click on guava, phone or brinjal.
Let's see the HTML code behind this HTML image map.
<map name="picmap">
<area shape="circle" coords="80,81,60" alt="Guava" href="guava.html">
<area shape="rect" coords="168,51,275,285" alt="Mobile Phone" href="phone.html">
<area shape="poly" coords="317,141,329,152,338,154,348,166,357,200,360,231,352,288,346,299,333,313,320,317,308,306,307,286,312,260,319,234,318,204,314,181,310,167,312,157,308,149" alt="Brinjal" href="brinjal.html">
</map>
<html>
<head>
<title>HTML Image Map Example</title>
</head>
<body>
<h1>HTML Image Map Example</h1>
<img src="fewobjects.jpg" alt="Picture with Objects" usemap="#picmap">
<map name="picmap">
<area shape="circle" coords="80,81,60" alt="Guava" href="guava.html">
<area shape="rect" coords="168,51,275,285" alt="Mobile Phone" href="phone.html">
<area shape="poly" coords="317,141,329,152,338,154,348,166,357,200,360,231,352,288,346,299,333,313,320,317,308,306,307,286,312,260,319,234,318,204,314,181,310,167,312,157,308,149" alt="Brinjal" href="brinjal.html">
</map>
<p>The above image map has been created using the map and area tag. The clickable areas have been defined using the x and y axis coordinates.</p>
</body>
</html>
So from the above code, you had a basic idea about the implementation.
We are actually defining some areas on the image using the coordinates and performing some tasks when the user clicks such defined areas.
Let's see step by step approach to defining the clickable area for guava, phone and brinjal.
Step 1:
The first step is to insert an image with the attribute.
We already know that the HTML <img> element is used for image insertion in an HTML document.
See the HTML code.
The value of the attribute starts with (hash).
After , one can write any name.
In the code above, we have written the name as .
Step 2:
In the second step, we will write the HTML <map> tag with the attribute.
The value of the attribute will be the same as the <img>'s attribute without i.e. picmap.
See the code.
Step 3:
This is the last step where we will define the clickable areas on the image using the HTML <area> element.
In the <area> tag we will specify three attributes , and .
shape
The value of the attribute holds the shape of the clickable area. We can specify the following values:
- circle - for circular figure
- rect - for rectangular figure
- poly - for polygonal figure
- default - for the entire figure
circle
If the clickable region is of a shape circle, we will write the value as circle in the attribute.
For guava, the clickable region is a circle.
For the circle area, we will need the coordinates of the centre of the circle and the radius in pixels.
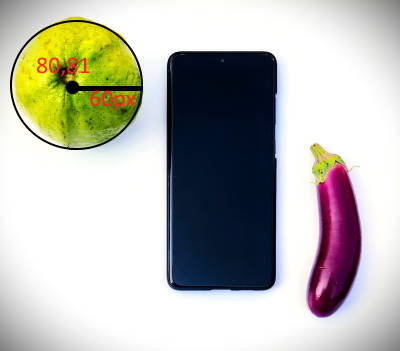
In the case of guava,
the coordinates of the centre of the circle = 80,81
radius = 60px
Hence the clickable area for the guava is defined as:
rect
For rectangular clickable figures, the value of the shape is written as rect.
In our example, the shape of the phone is a rectangle.
For rectangular shapes, we need to provide two pairs of coordinates.
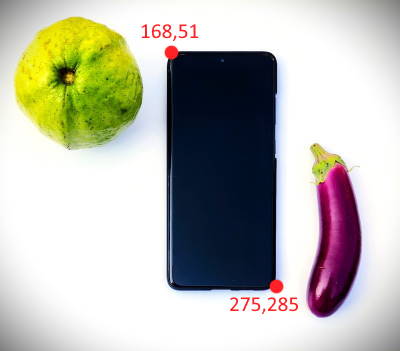
The first coordinates will be taken from the top left extreme point.
In the case of the phone, the coordinates are 168,51.
The second coordinates will be taken from the bottom right extreme point. i.e. 275,285
Hence the clickable area for the phone is defined as:
poly
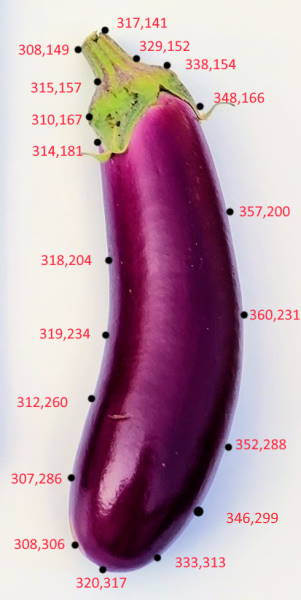
For irregular figures, we use the value poly in attribute.
In this case, we provide the coordinates of multiple points from the edges of the figure.
To define a clickable area for the brinjal, we will use poly and coordinates for the same are shown in the figure.
| 1. HTML Tutorial |
| 2. Introduction to HTML |
| 3. Basic HTML Page |
| 4. HTML Editors |
| 5. Web Browser |
| 6. HTML History |
| 7. Basic HTML Tags |
| 8. HTML Elements |
| 9. HTML Attributes |
| 10. HTML Headings |
| 11. HTML Paragraphs |
| 12. HTML Text Formatting |
| 13. HTML Styles |
| 14. HTML Comment |
| 15. HTML Quotation |
| 16. HTML Colors |
| 17. HTML RGB Colors |
| 18. HTML HEX Colors |
| 19. HTML HSL Color |
| 20. HTML CSS |
| 21. HTML Links |
| 22. HTML Link Colors |
| 23. Link within Page |
| 24. HTML Images |
| 25. HTML Background Image |
| 26. HTML Image Map |
| 27. HTML Picture Element |
| 28. HTML Favicon |
| 29. HTML Table |
| 30. HTML Table Border |
| 31. HTML Table Size |
- Disclaimer: ResultUniversity.com is an independent private website and it is in no way affiliated to any Indian Government official website. The sole purpose of this website is to provide notifications regarding the latest results published. Though utmost care is being taken, we can not guarantee 100% correctness of information. Using this website confirms that you agree to all the terms and conditions.